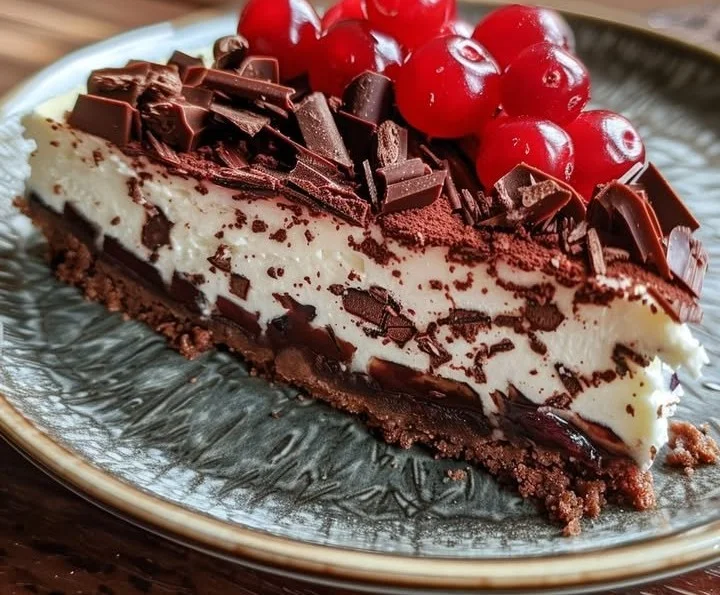
Black Forest Cheesecake
Black Forest Cheesecake is a delightful and indulgent dessert that combines creamy cheesecake, luscious cherries, and a touch of chocolate, making it an exquisite treat for any occasion. This rich and velvety dessert not only satisfies your sweet tooth but also evokes memories of family gatherings and celebrations with every bite. Its layered textures offer a satisfying contrast, from the crunchy chocolate crust to the smooth cream cheese filling and the juicy cherry topping. This recipe is perfect for anyone seeking an easy-to-follow, step-by-step guide to creating something truly special in their kitchen.
Why You’ll Love This Recipe
One of the main reasons you’ll fall in love with Black Forest Cheesecake is its simplicity. With minimal ingredients and straightforward preparation steps, you can whip up this decadent dessert without stress. It’s an excellent crowd-pleaser, making it perfect for parties, potlucks, or special celebrations. The rich flavors of chocolate, cream, and cherries create a magical combination that is sure to impress family and friends. Plus, every slice feels like a little indulgence, making it a great way to celebrate life’s sweet moments.
Ingredients
To make your Black Forest Cheesecake, you will need the following ingredients, each chosen for its richness and texture:
- 1 1/2 cups chocolate cookie crumbs: These provide a deliciously crispy base.
- 1/4 cup granulated sugar: A touch of sweetness that complements the chocolate.
- 1/3 cup unsalted butter, melted: Adds richness and binds the crust together.
- 24 oz cream cheese, softened: The creamy foundation that gives the cheesecake its signature texture.
- 1 cup granulated sugar: Balances the tanginess of the cream cheese for a perfectly sweet dessert.
- 1 teaspoon vanilla extract: Infuses the filling with aromatic flavor.
- 1 cup heavy cream, whipped: Lightens the filling for a fluffy texture.
- 2 cups canned or jarred cherries, drained: Juicy and tart, these cherries are the heart of the topping.
- 1/4 cup granulated sugar: A second addition of sugar for the cherry filling enhances its natural sweetness.
- 1 tablespoon cornstarch: Helps thicken the cherry mixture for a perfect spoon-able topping.
- 1/4 cup water: Necessary for cooking the cherry filling.
- Chocolate shavings or curls for garnish: Adds elegance and a touch of chocolatey goodness.
- Whipped cream for garnish: A classic finishing touch that adds creaminess.
- Maraschino cherries for garnish: A nod to the traditional Black Forest cake, these cherries complete the look.
Step-by-Step Directions
Prepare the Crust: In a medium bowl, combine the chocolate cookie crumbs, granulated sugar, and melted butter. Stir until the mixture resembles wet sand. Press it firmly into the bottom of a 9-inch springform pan to create a sturdy base.
Make the Cream Cheese Filling: In a large bowl, beat the softened cream cheese using an electric mixer until smooth and creamy. Gradually add in the granulated sugar and vanilla extract, continuing to beat until well combined.
Incorporate Whipped Cream: Gently fold in the whipped heavy cream into the cream cheese mixture. Do this slowly to maintain the fluffiness of the cream so that the filling remains light and airy.
Combine Filling and Crust: Once smooth, pour the cheesecake filling over the prepared chocolate crust in the springform pan, spreading it evenly with a spatula.
Chill the Cheesecake: Refrigerate the cheesecake for at least 4 hours or until it is fully set and firm to the touch.
Prepare the Cherry Topping: In a saucepan, combine the drained cherries, 1/4 cup of granulated sugar, cornstarch, and water. Cook over medium heat while stirring constantly until the mixture thickens and becomes bubbly. Remove from heat and let it cool down.
Assemble the Cheesecake: Once the cheesecake has set and the cherry topping has cooled, spread the cherry mixture evenly over the chilled cheesecake.
Garnish Before Serving: Just before serving, add a generous amount of chocolate shavings or curls, dollops of whipped cream, and maraschino cherries on top for a beautifully finished dessert.
Tips & Tricks
- For a deeper chocolate flavor, consider using chocolate graham crackers for the crust instead of standard chocolate cookies.
- Allowing the cream cheese to come to room temperature for a bit before beating can help achieve an ultra-smooth filling.
- Be gentle when folding in the whipped cream to keep the mixture light and fluffy.
- If you can’t find canned cherries, fresh cherries can work well too; just ensure they are pitted.
Serving Suggestions & Pairings
Black Forest Cheesecake can stand alone as a show-stopping dessert, but it pairs beautifully with a dollop of freshly whipped cream and a nice cup of coffee or tea. It’s an excellent choice for celebrations such as birthdays, anniversaries, or holiday gatherings. If you want to elevate the experience, serve it alongside a scoop of vanilla ice cream to complement the rich chocolate and cherry flavors.
Nutritional Information
While this dessert is indulgent, partaking in moderation is key. A typical slice of Black Forest Cheesecake contains approximately 350–450 calories, depending on portion size and toppings. It offers a delightful balance of carbohydrates, fats, and protein, making it a satisfying treat. Always aim to balance your dessert with a variety of other nutrients throughout the day.
Storing Tips & Variations
To store any leftover cheesecake, cover the springform pan tightly with plastic wrap or aluminum foil and place it in the refrigerator. It will last for about 3 days. For longer-term storage, you can freeze individual slices wrapped well to maintain freshness for up to 2 months. Variations of this recipe could include using different fruit toppings like strawberries or blueberries for a twist or incorporating layers of chocolate ganache for added richness.
Conclusion
I hope you’re inspired to try making this Black Forest Cheesecake for yourself. It’s a rewarding process that leads to a truly delightful dessert, perfect for any occasion. Whether it’s a special celebration or just a sweet treat for a weeknight, this cheesecake is sure to impress. Don’t forget to share your experience, and happy baking!
FAQs
Can I use low-fat cream cheese?
Yes, you can use low-fat cream cheese, but it may alter the texture slightly. It’s best to stick with full-fat for the creamiest results.What can I substitute for the cherries?
Besides cherries, you could try other fruits like raspberries or strawberries for a different flavor profile.Is it necessary to use a springform pan?
While it’s recommended for ease when serving, you can use a regular pie pan; just be careful when trying to remove the cheesecake.Can I prepare it in advance?
Absolutely! This cheesecake is a great make-ahead dessert, and it even tastes better after sitting for a day, allowing the flavors to meld.How can I make this recipe gluten-free?
Substitute traditional chocolate cookie crumbs with gluten-free options, such as gluten-free chocolate graham crackers or your preferred gluten-free cookies.

Black Forest Cheesecake
Ingredients
For the crust
- 1.5 cups chocolate cookie crumbs These provide a deliciously crispy base.
- 0.25 cup granulated sugar A touch of sweetness that complements the chocolate.
- 0.33 cup unsalted butter, melted Adds richness and binds the crust together.
For the cheesecake filling
- 24 oz cream cheese, softened The creamy foundation that gives the cheesecake its signature texture.
- 1 cup granulated sugar Balances the tanginess of the cream cheese.
- 1 teaspoon vanilla extract Infuses the filling with aromatic flavor.
- 1 cup heavy cream, whipped Lightens the filling for a fluffy texture.
For the cherry topping
- 2 cups canned or jarred cherries, drained Juicy and tart, these cherries are the heart of the topping.
- 0.25 cup granulated sugar Enhances the natural sweetness of the cherries.
- 1 tablespoon cornstarch Helps thicken the cherry mixture.
- 0.25 cup water Necessary for cooking the cherry filling.
For garnish
- Chocolate shavings or curls Adds elegance and a touch of chocolatey goodness.
- Whipped cream A classic finishing touch that adds creaminess.
- Maraschino cherries Completes the look of the cheesecake.
Instructions
Preparation
- In a medium bowl, combine the chocolate cookie crumbs, granulated sugar, and melted butter. Stir until the mixture resembles wet sand.
- Press the mixture firmly into the bottom of a 9-inch springform pan to create a sturdy base.
Make the Cream Cheese Filling
- In a large bowl, beat the softened cream cheese using an electric mixer until smooth and creamy.
- Gradually add in the granulated sugar and vanilla extract, continuing to beat until well combined.
- Gently fold in the whipped heavy cream into the cream cheese mixture to maintain fluffiness.
Combine Filling and Crust
- Pour the cheesecake filling over the prepared chocolate crust in the springform pan, spreading it evenly with a spatula.
Chill the Cheesecake
- Refrigerate the cheesecake for at least 4 hours or until fully set and firm to the touch.
Prepare the Cherry Topping
- In a saucepan, combine the drained cherries, 1/4 cup of granulated sugar, cornstarch, and water.
- Cook over medium heat while stirring constantly until the mixture thickens and becomes bubbly. Remove from heat and let it cool.
Assemble the Cheesecake
- Spread the cherry mixture evenly over the chilled cheesecake.
Garnish Before Serving
- Add chocolate shavings or curls, dollops of whipped cream, and maraschino cherries on top before serving.