
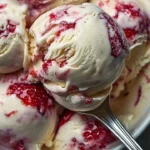
Homemade Strawberry Vanilla Bean Ice Cream
Every spoonful of Homemade Strawberry Vanilla Bean Ice Cream is a joyous hug on a hot summer day, where the creamy texture dances on your tongue, and the ripe strawberries burst with flavor. This delightful recipe is a perfect combination of rich vanilla and fresh strawberry, embodying the essence of indulgence in a bowl. With each step in this step-by-step guide, you’ll be transported into your kitchen, where the sweet aroma of vanilla and strawberries fills the air, coaxing memories of sun-soaked afternoons and laughter shared with loved ones.
History / Fun Fact
Ice cream has a storied past that spans centuries and continents. The origins are often traced back to ancient China, where a concoction made of milk and rice was frozen in the snow. The art of making ice cream evolved significantly over time, with the introduction of cream into the mix in Europe during the 16th century. But did you know that vanilla is one of the most popular flavors? It’s derived from the flower of the vanilla orchid, and its cultivation is no easy feat. In fact, each flower must be pollinated by hand, making it one of the most labor-intensive flavors available. This Homemade Strawberry Vanilla Bean Ice Cream pays homage to both the painstaking cultivation of vanilla and the delightful nature of summer strawberries.
Ingredients
To create this delectable ice cream, gather these essential ingredients that will tantalize your taste buds:
- 2 cups heavy cream: The rich and luscious base that will bring a creamy texture to your ice cream.
- 1 cup whole milk: To balance the heaviness of the cream, adding a light richness.
- 3/4 cup granulated sugar: Sweetness that enhances the strawberry’s natural flavor.
- 1 vanilla bean (or 2 tsp vanilla extract): Earthy, floral, and aromatic, freshly scraped seeds will elevate this dish to gourmet status.
- 4 large egg yolks: The secret to a velvety custard base, that gives ice cream its signature richness.
- 1 1/2 cups fresh strawberries, chopped: Juicy, sweet, and slightly tart, adding a fruity burst to every bite.
- 1/4 cup granulated sugar: To sweeten the strawberry mixture during cooking.
- 1 tsp lemon juice: Brightens the flavor, enhancing the strawberry’s sweet essence.
All these ingredients come together to create a treat that is purely halal and celebrates freshness in every scoop.
Cooking Time & Tips for Homemade Strawberry Vanilla Bean Ice Cream
When you’re in the mood for a creamy dessert, you may wonder whether to prepare your ice cream quickly or to opt for a more leisurely approach. Quick preparation is feasible but yields a less-developed flavor profile. For a truly indulgent treat, slow down! Allow the ice cream base to chill thoroughly in the fridge, letting the flavors meld and mature.
Practical tips for success:
- Ensure all your ingredients, especially the heavy cream, are chilled before use.
- Invest in a good-quality ice cream maker for optimal texture.
- Don’t skip the chilling step for the mixture; it’s crucial for enhancing flavor.
Step-by-Step Directions
Make the Strawberry Swirl
Start by combining 1 1/2 cups of fresh chopped strawberries, 1/4 cup of granulated sugar, and 1 tsp of lemon juice in a saucepan. Over medium heat, gently cook the mixture until the strawberries soften and release their juicy magic, which should take about 10 minutes. Mash the strawberries slightly with a fork, allowing the vibrant pink mixture to cool before transferring it to the refrigerator.
Prepare the Ice Cream Base
In another saucepan, combine 1 cup of whole milk, 2 cups of heavy cream, and half of the 3/4 cup of granulated sugar. As you heat this lovingly over low heat, scrape the seeds from 1 vanilla bean and add the seeds along with the pod to the mixture. Bring it to a gentle simmer, allowing the scents of vanilla to envelop your kitchen. Meanwhile, whisk together the 4 large egg yolks with the remaining sugar until the mixture becomes thick and pale in color. Carefully pour the warm milk mixture into the yolks while whisking constantly to create a smooth custard. Return this custard to the saucepan, cooking on low heat until it thickens enough to coat the back of a spoon. Strain your custard to remove any solids and refrigerate it for at least 4 hours or overnight if you’re planning ahead.
Churn the Ice Cream
Once your base has chilled completely, pour it into your ice cream maker and churn according to the manufacturer’s instructions. In the final minutes of churning, fold in the cooled strawberry swirl, allowing the pink streaks to intertwine beautifully through the vanilla ice cream.
Freeze & Serve
Transfer your luscious creation to an airtight container and freeze it for a minimum of 4 hours. When you’re ready to indulge, scoop out portions and relish in the creamy, fruity goodness that you’ve lovingly crafted right at home.
Serving Suggestions & Occasions
This Homemade Strawberry Vanilla Bean Ice Cream is perfect for a summer gathering, charming birthday parties, or simply as a way to indulge on any warm afternoon. Serve it with a sprig of fresh mint or a drizzle of chocolate sauce for a decadent twist. Pair it with a slice of rich chocolate cake or a warm fruit crumble for a delightful dessert duo that sings of joy.
Common Mistakes for Homemade Strawberry Vanilla Bean Ice Cream
- Not chilling the base properly: Rushing this step can lead to an icy texture.
- Over-churning the ice cream: This can result in a grainy texture instead of the creamy consistency you desire.
- Using warm ingredients: Starting with cold milk and cream helps create a smoother mixture.
Healthier Alternatives & Variations
For a lighter version of this delicious treat, consider substituting half of the heavy cream with coconut milk or Greek yogurt. You can also experiment with different fruits such as ripe peaches or blueberries for a refreshing twist. Want a dairy-free version? Try using coconut cream and almond milk, maintaining the rest of the flavors for a tropical delight.
FAQs
Can I make this ice cream without an ice cream maker?
Yes! Freeze the mixture in a shallow dish, stirring every 30-60 minutes to break up ice crystals until fully set.How long does it last in the freezer?
For the best flavor and texture, enjoy your homemade ice cream within 2 weeks.Can I use frozen strawberries?
While fresh strawberries yield a more intense flavor, you can use frozen ones as an alternative—just ensure they’re thawed and drained properly.What if my ice cream is too hard?
Let it sit at room temperature for 5-10 minutes before serving to soften slightly.Can I add other flavors to this recipe?
Absolutely! Feel free to mix in crushed cookies, chocolate chunks, or other fruits during the last few minutes of churning.Is it possible to reduce the sugar?
Yes, you can adjust sweeteners to your taste. Just remember that sugar helps with texture as well!
Conclusion
With just a few simple steps, you can create your own Homemade Strawberry Vanilla Bean Ice Cream that’s not only delicious but also brings cherished memories to life. So, why wait? Gather your ingredients and dive into this sensory experience today, and let each creamy bite be a testament to your love for homemade goodness! There’s no better time than now to indulge in a scoop (or three) of this delightful treat—and trust me, you’ll be left craving more.
Homemade Strawberry Vanilla Bean Ice Cream
Ingredients
Ice Cream Base
- 2 cups heavy cream The rich and luscious base that will bring a creamy texture to your ice cream.
- 1 cup whole milk To balance the heaviness of the cream, adding a light richness.
- 3/4 cup granulated sugar Sweetness that enhances the strawberry’s natural flavor.
- 1 vanilla bean or 2 tsp vanilla extract Earthy, floral, and aromatic; freshly scraped seeds elevate this dish.
- 4 large egg yolks The secret to a velvety custard base.
Strawberry Mixture
- 1 1/2 cups fresh strawberries, chopped Juicy, sweet, and slightly tart, adding a fruity burst.
- 1/4 cup granulated sugar To sweeten the strawberry mixture during cooking.
- 1 tsp lemon juice Brightens the flavor, enhancing the strawberry's essence.
Instructions
Make the Strawberry Swirl
- Combine 1 1/2 cups of fresh chopped strawberries, 1/4 cup of granulated sugar, and 1 tsp of lemon juice in a saucepan.
- Cook over medium heat until strawberries soften, about 10 minutes.
- Mash the strawberries slightly and cool the mixture before transferring it to the refrigerator.
Prepare the Ice Cream Base
- In another saucepan, combine 1 cup of whole milk, 2 cups of heavy cream, and half of the 3/4 cup of granulated sugar.
- Scrape the seeds from 1 vanilla bean and add to the mixture, along with the pod.
- Bring to a gentle simmer, whisk together the egg yolks with the remaining sugar until thick and pale.
- Pour the warm milk mixture into the yolks while whisking to create a smooth custard.
- Return the custard to the saucepan and cook on low heat until thick enough to coat the back of a spoon.
- Strain the custard to remove solids and refrigerate for at least 4 hours or overnight.
Churn the Ice Cream
- Once the base is chilled, pour it into your ice cream maker and churn according to instructions.
- In the final minutes of churning, fold in the cooled strawberry swirl.
Freeze & Serve
- Transfer the ice cream to an airtight container and freeze for a minimum of 4 hours.
- Scoop out portions and enjoy your homemade ice cream.